

So you are developing a Visual Studio extension which has some commands. And you want to make these commands’ visibility optional, so that the user can hide or display these commands based on her preference. Sounds pretty simple, right. Well, unfortunately it is anything but simple. Because it requires implementing multiple features just for one task, and these features are mostly unrelated.
First, let’s talk about why. Why I want to make the commands’ visibility optional. My extension is accessible from Quick Actions menu, from menu bar View → Other Windows, from editor context menu and from explorer item context menu. They all do the same thing, but I inserted it into as many places as possible, because I want it to be as accessible as possible; so that new users will find it easily without reading any manual. The other reason is for marketing; the more you pop your product in the user’s eye, the more she will remember and use it. But this approach has a drawback, some users might use the extension rarely or might feel their UI got overcrowded. For these cases, we give them the option to hide these shortcuts.
The implementation is made of three distinct parts, but I add a setup part in case of your extension doesn’t have a command or an options page. The parts are:
- Setup
- Changing visibility dynamically
- Writing to registry
- Setting initial visibility
1. Setup
In setup part, I will create a new project for extension, then add a command and an options page to it. I’m using Visual Studio 2019 version 16.1.4, but it should work on 2017 too. Also, make sure to install the Visual Studio extension development workload under Other Toolsets in the Visual Studio installer.
I’ll quickly go over setup since it’s not the focus of the blog. You can find more information about extension development in this series. For commands here and here; and for options page here and here are nice resources.
First create a new project with the template of VSIX Project (VSIX stands for Visual Studio extension installer, the project’s output will be an installer of the extension). The project should have a cs file for the package class and a manifest file. You can customize the extension’s name, version, description and many more in the manifest file.
Start debugging to test the extension. This will create a new Visual Studio instance, with its own settings and extensions (which is called Experimental Instance). The extension will be automatically installed in this instance. It will take a while to start Visual Studio for the first time. When loaded, view installed extension from menu bar Extensions → Manage Extensions, the extension should appear on the list. I advise not to use rebuild project or solution when compiling, otherwise the extension might not get updated correctly in the experimental instance. If the extension is not getting updated for some reason, try to increment version number in the manifest file.
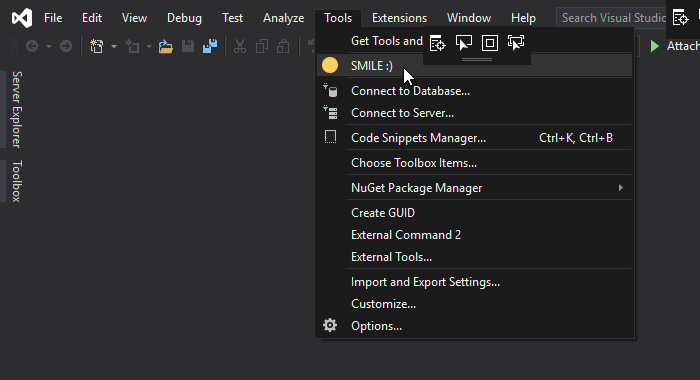
For now the extension has nothing and does nothing. Time to add a command to it, which will add a UI element to Visual Studio so that the extension will be accessible to users. Commands are the way you add actions to Visual Studio. Add a new item to the project, on left pane of pop-up window choose Extensibility and on the list choose Custom Command. This template command adds an item to the menu bar Tools.
Now there are three more files. A cs file for the command class; a png image file for the command’s resource; and a vsct file, aka command table file, in which some data of the commands are stored, its like the header for the commands (if extension had a command before, vsct will be updated instead of being inserted)
We will focus on the command table file later, for now you can change UI display name from there, just search for Invoke and change the full text. You can change UI icon from the resource file. And the command’s functionality is in the Execute method of the command class, of which can be modified. Test the extension again. A new item should appear in menu bar Tools.
Next step is adding the options page. It is quite easy to do. Add this class into the project:
using System.ComponentModel;
using Microsoft.VisualStudio.Shell;
using Microsoft.VisualStudio.Shell.Settings;
using Microsoft.VisualStudio.Settings;
using Task = System.Threading.Tasks.Task;

namespace YellowNamespace
{
    [DesignerCategory("code")] // to hide designer
    class YellowOptionsPage : DialogPage
    {
        [Category("UI")]
        [DisplayName("Display command")]
        [Description("Display or hide extension shortcut in Tools menu")]
        public bool IsDisplayingYellowCommand { get; set; } = true;
    }
}
Each public property will be displayed in the options page. Category attribute will group them together. Then add ProvideOptionPage attribute to the package class.
[PackageRegistration(UseManagedResourcesOnly = true, AllowsBackgroundLoading = true)]
[Guid(YellowPackage.PackageGuidString)]
[ProvideMenuResource("Menus.ctmenu", 1)]
[ProvideOptionPage(typeof(YellowOptionsPage), "Yellow Extension", "General", 0, 0, true)]
public sealed class YellowPackage : AsyncPackage
Go to Tools → Options → Yellow Extension, you will see that there is an option value named Display command. Visual Studio automatically creates the option page for the extension. The extension can have multiple options pages; to do it, add another DialogPage derived class, and add another ProvideOptionPage attribute for it.
We have an extension with a command and an options page, we could move on to changing the command’s visibility.
2. Changing visibility dynamically
We want to change command’s visibility dynamically, so let’s take a look at the command class. It does not inherit a class. It’s fields are id, guid and package; both are irrelevant. But inside the constructor, we see a variable named menuItem of type MenuCommand. Inspect its members and you’ll see property Visible, which is settable. Let’s try assigning it.
private YellowCommand(AsyncPackage package, OleMenuCommandService commandService)
{
	this.package = package ?? throw new ArgumentNullException(nameof(package));
	commandService = commandService ?? throw new ArgumentNullException(nameof(commandService));

	var menuCommandID = new CommandID(CommandSet, CommandId);
	var menuItem = new MenuCommand(this.Execute, menuCommandID);
	commandService.AddCommand(menuItem);

	// TODO, remove this later
	menuItem.Visible = false;
}
If you test the extension, you will see that nothing changes. Unfortunately, we need to mark the command. Add CommandFlag DynamicVisibility to the command in the command table (.vsct file).
<Button guid="guidYellowPackageCmdSet" id="YellowCommandId" priority="0x0100" type="Button">
  <Parent guid="guidYellowPackageCmdSet" id="MyMenuGroup" />
  <Icon guid="guidImages" id="bmpPic1" />
  <CommandFlag>DynamicVisibility<!--This flag makes setting property Visible functional--></CommandFlag>
  <Strings>
    <ButtonText>SMILE :)<!--Change text of the menu item here--></ButtonText>
  </Strings>
</Button>
Test again, and you will see that the command will be hidden when you clicked on it. Now that we have found what we seek, time to use it properly. Undo command’s constructor and let’s head back to options page. Options page’s base class, class DialogPage have virtual methods named SaveSettingsToStorage, SaveSettingsToXml and OnApply; all of which are called when options are changed. I’m choosing SaveSettingsToStorage because the extension will read from and write to storage later. Override the method and change the command’s visibility inside.
// This method is called each time an option value is changed
public override void SaveSettingsToStorage()
{
	base.SaveSettingsToStorage();

	// Retrieve the command and change its visibility
	OleMenuCommandService commandService = this.GetService(typeof(System.ComponentModel.Design.IMenuCommandService)) as OleMenuCommandService;
	var yellowCommand = commandService.FindCommand(new System.ComponentModel.Design.CommandID(YellowCommand.CommandSet, YellowCommand.CommandId));
	yellowCommand.Visible = IsDisplayingYellowCommand;
}
Test the extension, and you will see that command becomes visible when the option is set to true and becomes hidden when set to false.
But we have a very big problem here. Assume the user wants to hide the command and sets the option to false. When she changes the option, the command will be hidden. But when Visual Studio restarts, the command will be visible again. Well okay, that’s expected since we assign the property Visible only in the options page. If we are to assign it in the package initializer method too (it’s like the Main method, method InitializeAsync is called first in the extension), it will be fixed, right (spoilers, no it won’t).
protected override async Task InitializeAsync(CancellationToken cancellationToken, IProgress<ServiceProgressData> progress)
{
    // When initialized asynchronously, the current thread may be a background thread at this point.
    // Do any initialization that requires the UI thread after switching to the UI thread.
    await this.JoinableTaskFactory.SwitchToMainThreadAsync(cancellationToken);
    await YellowCommand.InitializeAsync(this);

    // TODO, remove below later
    // Retrieve the options page
    var optionsPage = (YellowOptionsPage)GetDialogPage(typeof(YellowOptionsPage));

    // Retrieve the command and change its visibility
    OleMenuCommandService commandService = await this.GetServiceAsync(typeof(System.ComponentModel.Design.IMenuCommandService)) as OleMenuCommandService;
    Microsoft.Assumes.Present(commandService);
    var yellowCommand = commandService.FindCommand(new System.ComponentModel.Design.CommandID(YellowCommand.CommandSet, YellowCommand.CommandId));
    yellowCommand.Visible = optionsPage.IsDisplayingYellowCommand;
}
It won’t work because Visual Studio does not load the extension until it is needed, meaning Visual Studio does not execute any code from the extension until it is needed. Showing commands in the top menu or context menu is not enough for initializing the package, because they are only UI elements, like shortcuts. So, we need something, and that thing cannot be C# code, for adjusting command visibility before the package loads.
One way of solving it will be adding attribute ProvideAutoLoad to the package class. It will make the extension to be automatically loaded when Visual Studio starts up or loads a solution etc. I don’t recommend using it since it will slow down start up or load time. But maybe, if you are prototyping, you may use this and skip the next two steps.
// Bad approach, NOT RECOMMENDED
[PackageRegistration(UseManagedResourcesOnly = true, AllowsBackgroundLoading = true)]
[Guid(YellowPackage.PackageGuidString)]
[ProvideMenuResource("Menus.ctmenu", 1)]
[ProvideOptionPage(typeof(YellowOptionsPage), "Yellow Extension", "General", 0, 0, true)]
[ProvideAutoLoad(Microsoft.VisualStudio.Shell.Interop.UIContextGuids80.SolutionExists, PackageAutoLoadFlags.BackgroundLoad)]
[ProvideAutoLoad(Microsoft.VisualStudio.Shell.Interop.UIContextGuids80.NoSolution, PackageAutoLoadFlags.BackgroundLoad)]
public sealed class YellowPackage : AsyncPackage
For more information about changing visibility and enabled state of commands; visit here and here and here.
3. Writing to registry
Next part requires reading from registry, for simplicity I will be implementing this part beforehand.
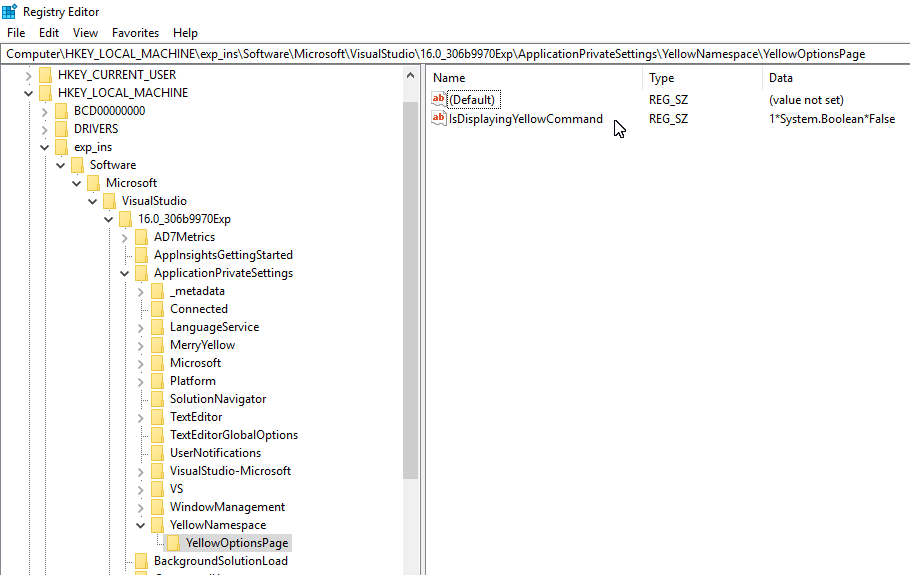
The extension’s option values are already stored in the registry. Registry is where Visual Studio’s option values are read from and written to, but they are not in the format the extension needs. Option values are stored as strings, even if they are booleans or integers. In the next part, the extension will require a boolean value, which must be stored as a zero or a non-zero value. First locate the current value in the registry. Visual Studio does not use system registry, it has its own registry file (as of version 2017, so that we can have multiple versions of it installed). This document explains how to open it (also this), but don’t forget to open experimental instance’s registry file (Mine is at C:\Users\SARI\AppData\Local\Microsoft\VisualStudio\16.0_306b9970Exp\privateregistry.bin). Expand through Software → Microsoft → VisualStudio → 16.0_306b9970Exp → ApplicationPrivateSettings → YellowNamespace → YellowOptionsPage in registry. You should see property IsDisplayingYellowCommand, and its value 1*System.Boolean*False (If you have not saved the options before, the property or registry path will not exist; if so try changing the option values and save it).
We can use the existing method of SaveSettingsToStorage for saving the custom registry property. First declare registry path and property name as const fields. Then create a new WritableSettingsStore, a helper class for writing to registry. But creating it requires the main thread, so convert the method SaveSettingsToStorage to async and switch to main thread before the creation. Finally use the helper to store the custom property. (details about using and writing to SettingsStore, also this)
[DesignerCategory("code")] // to hide designer
class YellowOptionsPage : DialogPage
{
	/// <summary>
	/// Where extension options are stored in the registry, can be get from base property SharedSettingsStorePath
	/// </summary>
	const string registryCollectionPath = @"ApplicationPrivateSettings\YellowNamespace\YellowOptionsPage";
	const string propertyName = nameof(IsDisplayingYellowCommand) + "Raw";

	[Category("UI")]
	[DisplayName("Display command")]
	[Description("Display or hide extension shortcut in Tools menu")]
	public bool IsDisplayingYellowCommand { get; set; } = true;

	// This method is called each time an option value is changed
	public override void SaveSettingsToStorage()
	{
		base.SaveSettingsToStorage();

		// overridden base method is not async, so run our own async method with ThreadHelper
		ThreadHelper.JoinableTaskFactory.Run(async delegate
		{
			await SaveSettingsToStorageAuxAsync();
		});
	}

	async Task SaveSettingsToStorageAuxAsync()
	{
		// Retrieve the command and change its visibility
		OleMenuCommandService commandService = this.GetService(typeof(System.ComponentModel.Design.IMenuCommandService)) as OleMenuCommandService;
		var yellowCommand = commandService.FindCommand(new System.ComponentModel.Design.CommandID(YellowCommand.CommandSet, YellowCommand.CommandId));
		yellowCommand.Visible = IsDisplayingYellowCommand;

		// Write custom property to the registry
		await ThreadHelper.JoinableTaskFactory.SwitchToMainThreadAsync();
		var settingsManager = new ShellSettingsManager(ServiceProvider.GlobalProvider);
		var userSettingsStore = settingsManager.GetWritableSettingsStore(SettingsScope.UserSettings);
		userSettingsStore.SetBoolean(registryCollectionPath, propertyName, IsDisplayingYellowCommand);
	}
}
Test the extension, save the options then examine the registry, make sure the custom property is stored as a boolean in the registry before proceeding to the next part.
4.Setting initial visibility
Our aim was to change command visibility without loading the package. For this we will use rule-based UI Context. Remember the command table file, it’s an xml file, it doesn’t have any C# code; and Visual Studio parses it even if its package is not loaded. We can define a rule in this file by adding a visibility constraint.
Take a look at this documentation, especially term types (Also this for an extra resource). Terms are mostly related with project and solution, but term UserSettingsStoreQuery:<query> is the one we need (unfortunately googling UserSettingsStoreQuery results only to this documentation by the time I write this post; and the information is quite limited, which is the other reason I’m writing this post). It enables us define a rule by a registry value.
If registry value of the query does not exist, it returns false; if the query evaluates to a zero value, it returns false; if the query evaluates to a non-zero value, it evaluates to true. This is why we needed to write our custom property to registry, because otherwise it would have evaluated to non-zero in all cases since original properties are stored as strings.
Query string needs the same collection path that was used in WritableSettingsStore, and a slash and property name appended to it, like this:
collectionPath = @"ApplicationPrivateSettings\YellowNamespace\YellowOptionsPage";
propertyName = @"IsDisplayingYellowCommandRaw";
queryString = @"ApplicationPrivateSettings\YellowNamespace\YellowOptionsPage\IsDisplayingYellowCommandRaw";
term = @"UserSettingsStoreQuery:ApplicationPrivateSettings\YellowNamespace\YellowOptionsPage\IsDisplayingYellowCommandRaw"
UserSettingsStoreQuery:<query> (or @"UserSettingsStoreQuery:ApplicationPrivateSettings\YellowNamespace\YellowOptionsPage\IsDisplayingYellowCommandRaw") is just one term. Terms are like variables, you can define multiple terms, then use them in the expression. Expression is like a if condition with operators & [and], | [or], ! [not], () [parentheses]. Examples in the documentation will give you a better idea.
Time for the implementation. First declare a const string in OptionsPage for the query of the rule.
/// <summary>
/// Where extension options are stored in the registry, can be get from base property SharedSettingsStorePath
/// </summary>
const string registryCollectionPath = @"ApplicationPrivateSettings\YellowNamespace\YellowOptionsPage";
const string propertyName = nameof(IsDisplayingYellowCommand) + "Raw";

/// <summary>
/// Full path into registry for boolean value of IsDisplayingYellowCommand, to be consumed by UI context rule
/// </summary>
public const string RegistryFullPathToIsDisplayingYellowCommandAsBoolean = registryCollectionPath + @"\" + propertyName;
In the command table (.vsct file), create a new GuidSymbol with a new guid. Then add a VisibilityConstraints item where guid and id is same as the command’s, and context is the new guid that just got created.
</Commands>

<VisibilityConstraints>
  <!-- UI context rule of 'guidUIContextRuleOfYellowCommand' is bind to the command 'YellowCommand' here -->
  <VisibilityItem guid="guidYellowPackageCmdSet" id="YellowCommandId" context="guidUIContextRuleOfYellowCommand" />
</VisibilityConstraints>

<Symbols>
  <!-- This is the package guid. -->
  <GuidSymbol name="guidYellowPackage" value="{feb28215-eba5-4494-a5b9-c2a14e885d1d}" />

  <!-- This is the UI context rule guid. -->
  <GuidSymbol name="guidUIContextRuleOfYellowCommand" value="{cc77a238-dcac-447c-bc95-bfd4d760d7e6}" />

  <!-- This is the guid used to group the menu commands together -->
  <GuidSymbol name="guidYellowPackageCmdSet" value="{5532f941-37bf-41fd-afce-5f42f849438b}">
    <IDSymbol name="MyMenuGroup" value="0x1020" />
    <IDSymbol name="YellowCommandId" value="0x0100" />
  </GuidSymbol>
We are done with the command table. Define the rule as an attribute for the package class.
[PackageRegistration(UseManagedResourcesOnly = true, AllowsBackgroundLoading = true)]
[Guid(YellowPackage.PackageGuidString)]
[ProvideMenuResource("Menus.ctmenu", 1)]
[ProvideOptionPage(typeof(YellowOptionsPage), "Yellow Extension", "General", 0, 0, true)]
[ProvideUIContextRule("cc77a238-dcac-447c-bc95-bfd4d760d7e6", "UIContextRuleOfYellowCommand",
	expression: "userWantsToSeeIt",
	termNames: new[] { "userWantsToSeeIt" },
	termValues: new[] { "UserSettingsStoreQuery:" + YellowOptionsPage.RegistryPathToIsDisplayingYellowCommand }
)]
public sealed class YellowPackage : AsyncPackage
{
// where YellowOptionsPage.RegistryPathToIsDisplayingYellowCommand =>
// @"ApplicationPrivateSettings\YellowNamespace\YellowOptionsPage\IsDisplayingYellowCommandRaw"
I have named the term userWantsToSeeIt. Also note that guid is same as the one in the command table (.vsct file).
We almost achieved what we have wished for. When user changes the options, the visibility of the command changes too. And command’s visibility is now persistent, is not being effected when Visual Studio restarts. There is one minor issue left. When Visual Studio starts for the first time after installing the extension, registry will be empty. So the term userWantsToSeeIt will be false since there will be no registry value in that path.
If we can detect that options are saved before or not, it can be used to fix this issue. And remember that original option value is stored as string, and always returns true, as long as it is stored. So if we query for the original option value, query will return false if option values are never saved before and query will return true if option values are saved before. Updating the rule expression to userWantsToSeeIt|!hasRunBefore will fix the issue.
Declare another const field in the options class
/// Full path into registry for boolean value of IsDisplayingYellowCommand, to be consumed by UI context rule
/// </summary>
public const string RegistryFullPathToIsDisplayingYellowCommandAsBoolean = registryCollectionPath + @"\" + propertyName;
Then update the UI context rule expression (add term hasRunBefore) in the package class
[PackageRegistration(UseManagedResourcesOnly = true, AllowsBackgroundLoading = true)]
[Guid(YellowPackage.PackageGuidString)]
[ProvideMenuResource("Menus.ctmenu", 1)]
[ProvideOptionPage(typeof(YellowOptionsPage), "Yellow Extension", "General", 0, 0, true)]
[ProvideUIContextRule("cc77a238-dcac-447c-bc95-bfd4d760d7e6", "UIContextRuleOfYellowCommand",
	expression: "userWantsToSeeIt|!hasRunBefore",
	termNames: new[] { "userWantsToSeeIt", "hasRunBefore" },
	termValues: new[] {
		"UserSettingsStoreQuery:" + YellowOptionsPage.RegistryFullPathToIsDisplayingYellowCommandAsBoolean,
		"UserSettingsStoreQuery:" + YellowOptionsPage.RegistryFullPathToIsDisplayingYellowCommandAsString
	}
)]
public sealed class YellowPackage : AsyncPackage
Now all cases are handled. When user changes the options, the visibility of the command changes too. And command’s visibility is persistent, is not being effected when Visual Studio restarts. And command’s visibility is correct even if the package is never loaded.
There is one final bug left, which is absent in the sample code. When command’s visibility is changed dynamically after options are updated, UI context rule is no more valid. My extension uses one more term in the UI context rule, which is "HierSingleSelectionName:.cs$". It’s command is displayed in the explorer item context menu for only .cs files, not for other file types. But when user updates the options, that rules becomes invalid and the command is displayed for all file types. I let this bug unresolved since it’s not an important one for my extension.
Well, that’s it. You can access to the sample project on github, I committed each step one by one, don’t forget to replace guids if you build something upon it. Also you can see the functionality in action in my extension, Pattern Maker.